Crokinole – How to Play Like a Pro
How to Play Like a Pro
Want to play crokinole like a pro—landing clean 20s, locking down the center, and winning close ends with confidence? This comprehensive guide walks you from fundamentals to advanced strategy, with practical drills, gear advice, and tournament-ready routines. It’s written for newcomers and seasoned players alike, with step-by-step technique, strategic decision-making, and a printable quick-reference so you can improve right at the crokinole board.
Why Crokinole Captivates Players
Crokinole marries the precision of billiards with the pace of a dexterity game. Every flick offers instant feedback, and small technical improvements compound quickly into higher scores. It’s social and quick to learn, yet it rewards deep focus, pattern recognition, and composure under pressure. Whether you’re gathering for family game night or preparing for a local tournament, crokinole scales with your ambition—fun on day one, endlessly rich for years.
A Short History of Crokinole
Most sources trace crokinole’s origins to late-19th-century Canada, where round wooden boards were crafted for social gatherings and parlor play. The modern board’s defining features—concentric rings, a center “20” cup, and a ring of pegs—evolved to balance offense and defense, rewarding finesse over brute force. As the game spread, makers standardized sizes and ring spacings, enabling clubs and tournaments to flourish. Today, crokinole continues to attract players who appreciate craftsmanship, tactile gameplay, and a welcoming community that values fair play and skill development.
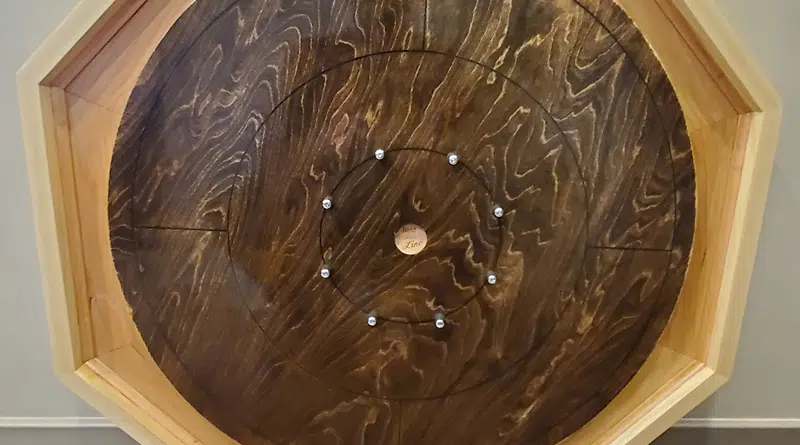
Board Anatomy & Setup
Understanding the board helps you plan shots and read angles like a pro. While makers vary details, quality boards share core traits:
- Surface diameter: Typically 26″–30″, finished smooth for consistent glide.
- Scoring rings: Three outer rings score 5 (outer), 10 (middle), and 15 (inner), plus a center hole worth 20.
- Center cup: A disc that drops cleanly into the cup scores 20 and is removed from play into a tray for tallying.
- Pegs (posts): Mounted around the inner ring; they deflect shots and add tactical depth by creating angles and barriers.
- Shooting line: A perimeter line in each quadrant; your disc must start on/behind it at setup.
- Gutter: The recessed ring around the board; discs that leave the scoring area fall here and don’t score.
Discs: Sets include two colors. In singles, each player gets 12 discs; in doubles, partners share 12 discs per team. Discs are usually hardwood (e.g., maple) with a beveled edge to promote a clean release.
Basic Rules (Clean, Consistent, Competitive)
- Players: Two (singles) or four (doubles). In doubles, partners sit opposite and alternate turns.
- Turn order: Alternate flicks (A, B, A, B). In doubles: A1, B1, A2, B2, then repeat.
- Shooting position: The shooting disc begins on/behind your quadrant’s line. Only the flick should propel it—no pushing or sliding into motion.
- Mandatory contact: If your opponent has any disc on the board at the start of your turn, your shot must contact one of those discs. If not, your shot is a foul.
- 20s: A disc that drops into the center cup is immediately removed to your 20s tray and cannot be taken out. It’s safe points and a momentum swing.
- Fouls & removal: On a foul (e.g., failure to contact when required, disc leaves the board, improper start), remove your shooter and any of your own discs it touched during that shot. Opponent discs usually remain (confirm house rules).
- End of round scoring: After all discs are played, remove 20s and total ring points (15/10/5). The side with the higher total scores the difference for that round.
Scoring Rings at a Glance
| Zone | Points | Notes |
|---|---|---|
| Center Cup | 20 | Remove immediately to the 20s tray |
| Inner Ring | 15 | Inside pegs, not in the cup |
| Middle Ring | 10 | |
| Outer Ring | 5 |
Shooting Technique: The Foundation of Pro Play
Strong strategy means little if your flick is inconsistent. Build from the ground up: stance, anchor, release, and follow-through. Focus on repeatability; your goal is a motion you can perform under pressure without thinking.
1) Stance & Anchor
- Stable base: Sit or stand in a way that keeps your shoulders square to the line. Many players sit to reduce sway and level their gaze with the board.
- Anchor hand: Plant your non-shooting hand lightly on the rail or board to stabilize the torso. A steady platform equals a consistent line.
- Head position: Keep your eyes over the intended aim line. Looking from the side distorts angles.
- Breath: Exhale gently just before you flick to relax the wrist and fingertips.
2) Grip & Release
- Finger choice: Most players shoot with the middle finger (supported by the index); some use the index alone. Test both and select the one that feels natural.
- Touch: Rest the finger pad on the disc rim with minimal downward pressure. Too much force makes the disc stick and jump.
- Path: Drive straight through the line—no hooks. Imagine your fingertip traveling along a laser toward the target.
- Follow-through: Continue the motion to a specific spot past the disc. This “aim small, miss small” idea tightens dispersion and smooths speed.
- Nails: Smooth edges with a file or buffer. Snaggy nails ruin releases; keep them even and clean.
3) Speed Control (“Weight”)
- Under-power first: Start with slower shots while you learn to hold a line. Add speed later to expand options.
- Stop zones: Practice finishing inside the 15 without touching pegs and parking on the 10 with consistency.
- Table & finish: Each board’s finish and room humidity affect glide. Take 2–3 minutes to calibrate speed before a match.
4) Common Technical Errors
- Overpowering: Big swings amplify aim errors. Use only the speed necessary to achieve your objective.
- Hooking: A sideways wrist flick curves the path unpredictably. Keep the release straight along your aim line.
- Pressing down: Downforce sticks the disc and causes stutters. Relax your fingertip and trust the snap.
- Rushing: Quick setups lead to illegal starts and missed contacts. Build a simple pre-shot routine and stick to it.
Advanced Strategy: Decisions That Win Ends
At higher levels, crokinole is a game of percentages. Pros choose the shot that maximizes expected value (EV): the blend of points now, board control next, and risk to future turns. Here’s how to structure those choices.
Opening Principles
- Free look = 20 attempt: With no opponent discs on the board, a clean 20 bid is often optimal—especially early, when momentum matters.
- Safe center presence: If the 20 is crowded by pegs, aim to finish inside the 15 and slightly off-center. You’ll clog the lane and force tough angles.
- Don’t donate 20s: Avoid leaving straight center-line taps your opponent can convert.
When Removal Beats Points
- Threat assessment: If an opponent disc offers them an easy 20 setup or uncontested 15/10, prioritize the take-out.
- Stick & stay: High-value removals also leave your disc scoring and awkward to answer. Practice lines that remove and park.
- Two-turn thinking: Choose shots that make your next shot better even if the current value is modest.
Center Control & Peg Geometry
- Clogging lanes: Occupying the 15 ring is a classic defensive posture, narrowing central angles.
- Frozen discs: “Freezing” to an opponent disc (light contact, stop adjacent) can force them into low-EV removals.
- Using pegs: Aim for slight glances that bend paths around pegs into scoring stops. This creates “guards” that are hard to dislodge.
Edge Cases: Banking & Brushes
- Bank shots: Off-rail banks are situational but can rescue bad angles. Prioritize control over power.
- Brush contacts: A whisper-light contact that barely kisses an opponent disc may be all you need for legality before finishing in a ring.
- Double take-outs: Occasionally available through pegs. Only attempt if the line is clean and the payoff is large.
Score-State Strategy
- Leading late: Favor low-risk, center-clogging shots and high-probability removals. Force your opponent to chase.
- Trailing late: Increase variance: look for 20 attempts and multi-removal lines. Create chances, even with modest risk.
- Parity awareness: In tight rounds, track ring totals and 20s closely. Choose shots that flip the differential, not just the board state.
Doubles: Communication & Roles
- Role clarity: One partner can emphasize setup and center control; the other specializes in clean removals and 20s.
- Shot calls: Agree on concise language: inside peg, outside brush, soft stop, firm line, freeze, stick.
- Tempo: Keep a steady rhythm to avoid analysis paralysis while reserving a deep breath for pressure shots.
Drills & Training Plans
 Improvement accelerates when you measure it. Adopt short, focused sessions and track outcomes. Here’s a four-week plan you can recycle.
Four-Week Practice Plan
Week 1: Line Fundamentals
- 20s Ladder (10 min): Consecutive 20 attempts. Track best streak and overall percentage.
- Quadrant Lines (10 min): From each quadrant, shoot straight to the inner ring without touching pegs.
- Soft Stops (5 min): Land on the 10 with minimal rebound.
Week 2: Legal Contacts & Freezes
- Single Target (10 min): Place one opponent disc at 10 or 15. From each quadrant, make legal contact and finish scoring.
- Freeze Drill (10 min): Lightly touch an opponent disc and stop adjacent on the 10 or 15.
- Endgame Sim (5 min): Practice last-shot decisions with a timer.
Week 3: Removals & Stick
- Take-Out Lines (10 min): Remove a set disc while keeping your shooter in the 10 or 15.
- Peg Bends (10 min): Use slight peg brushes to redirect into scoring zones.
- Variance Control (5 min): Choose the safer of two lines and execute it five times in a row.
Week 4: Pressure & Percentage
- Timed Series (10 min): 20 seconds per shot; alternate 20 attempts and removals.
- Score-State Sets (10 min): Simulate being up/down by 10–15 points and select EV-positive shots.
- Mock Match (10 min): Play a short match focusing on routine and breathing.
Tracking What Matters
- 20%: Percentage of successful 20 attempts during drills.
- Take-out + stick rate: Removals that also leave you scoring.
- Foul rate: Missed contacts, illegal starts, and board exits. Aim to push this under 5%.
- Peg touch rate: Useful vs. harmful peg interactions—know how the board “plays.”
Equipment & Care: Getting the Most from Your Board
Boards: Tournament boards prioritize smoothness, stable bases, and consistent ring spacing. Larger boards (28″–30″) provide room for nuanced angles; compact boards are great for travel and tight spaces. Check that the surface is flat and the pegs are secure and evenly placed.
Discs: Hardwood discs with consistent bevels flick cleaner and more predictably. Keep a spare set for guests and practice.
Surface care: Dust with a soft cloth before play. Some players apply a tiny amount of carnauba wax to maintain glide. Avoid silicone products and excessive wax—both can create uneven speed.
Storage: Keep your board in a dry, temperate environment. For travel, use a padded case and store vertically to reduce warping risk.
Etiquette: Play Smooth, Play Fair
- Stillness: Avoid moving or casting shadows while someone is shooting.
- Honesty: Call your own fouls and accept close measurements graciously.
- Board respect: Keep food and drinks away from the surface; clean hands help preserve finish.
- Reset discipline: Ensure pegs are seated and discs properly placed before the next shot.
Tournament Mindset & Routines
Competition tightens focus—and nerves. Build routines that keep your body relaxed and your decisions clear.
- Warm-up (10–15 minutes): Alternate 20s, removals, peg stops, and one rhythm drill to dial in speed.
- Between ends: Reset posture, review the next opener, and take a grounding breath.
- Hydrate & fuel: Light snacks and water help maintain steady hands.
- Know local rules: Time limits, measurement protocol, tie-breakers—get clarity before the first flick.
Variants & House Rules
Crokinole groups often adopt small variations to suit preference or board design. Consider:
- Scoring caps: Playing to a fixed number of points (e.g., 100 or 120) or a set number of ends.
- Time controls: Shot clocks for tournaments to keep matches brisk.
- Disc swaps: Switching colors at mid-match to equalize perceived board quirks.
Troubleshooting: Fixes for Tricky Shots
- Short of the 20 cup: You’re decelerating or pressing down. Commit to a smooth, through-the-line snap.
- Rim-outs on 20 attempts: Your line is good but speed is high. Reduce power by 5–10% and maintain follow-through.
- Missed legal contact: You aimed center-to-center instead of edge-to-edge. Visualize just enough brush to satisfy the rule, then finish in a ring.
- Unwanted peg hits: You’re not reading curvature. Map the angle with your eyes, then choose a slightly wider line to avoid peg magnets.
- Discs jumping: Likely downward pressure or a rough nail. Relax and smooth nails before play.
Glossary: Speak Like a Crokinole Pro
- 20 (Twenty): A disc that drops into the center cup; removed from play and scores 20 points.
- Freeze: A shot that ends parked against an opponent disc, making it hard to remove cleanly.
- Stick: Completing a take-out and leaving your shooter in a scoring position.
- Brush: A light, grazing contact used to satisfy the legal-contact rule or bend a line.
- Bank: A shot off the rail to change angle.
- EV (Expected Value): The average payoff of a shot considering score now, future board state, and risk.
Common Questions
Do I always have to hit an opponent disc?
Only if your opponent has any disc on the board at the start of your turn. If the board is clear, you can aim freely for the 20 or a ring. When contact is required, even a light brush counts—plan to finish in a scoring zone after the touch.
What happens to a 20?
Remove it immediately to your 20s tray. It cannot be knocked out, which is why 20s have outsized impact on momentum and scoring. Practicing consistent 20 attempts is one of the highest-leverage ways to improve.
How is an end scored?
After all discs are played, remove 20s and total remaining ring points (15/10/5). The side with the higher total earns the difference as points for that end. Many casual games play to 100+ points; events may use match points or timed ends.
Is standing or sitting better?
Many players sit because it reduces body sway and aligns the eyes with the board plane. Standing can work if your base is stable and your anchor hand fully controls upper-body motion. Try both and commit to one routine for consistency.
What board finish is “best”?
Any finish that’s smooth, durable, and consistent across the surface can be great. Differences in speed are normal; learn to calibrate quickly with a two-minute warm-up (20s, removals, peg stops). Avoid silicone products and excessive wax, which can create unpredictable spots.
How do I practice efficiently?
Short, focused routines beat long, unfocused sessions. Track 20 percentage, take-out + stick rate, and foul rate. Revisit the drills in the four-week plan and rotate emphasis based on your weakest metric.
Printable Quick Reference
Want a one-page summary for table-side use? Download our printable PDF containing rules, scoring, drills, etiquette, and tournament tips at a glance:
Download the Quick Reference PDF
Call to Action
Ready to level up your play? Share this guide with your group, schedule a practice night, and start tracking your drills. If you’re looking to upgrade your setup, explore handcrafted boards and accessories from makers you trust. Keep the surface clean, build a simple routine, and play with intention. Every disc is an opportunity to improve your average and your 20s rate—see you at the board. Contact us to make a board for you .
Final Thoughts
Crokinole rewards calm focus, clean technique, and smart choices. Master a repeatable flick, protect the center, and practice with purpose. As your accuracy improves, you’ll notice more ends decided by one or two shots—the ones you’re now equipped to make. Stay patient, enjoy the satisfying click of a well-executed line, and keep learning each time you sit down to play.
Shot-Selection Playbook: Real Scenarios
Knowing what to shoot matters as much as knowing how to shoot. Use these example situations to sharpen your decision-making and build instincts you can trust under pressure.
Scenario 1: Clear Board, Your Shot
Board: No discs in play. Play: Attempt a clean 20. Why: With no contact requirement, the highest-EV shot is to bank early momentum and force your opponent to answer. If pegs crowd your angle, park a soft 15 to clog the center and re-evaluate next turn.
Scenario 2: Opponent on the 10, Angle Through Pegs
Board: One opponent disc sits on the 10, slightly offset behind pegs. Play: Plan a brush contact through the gap that removes or moves their disc while finishing in at least the 10. Why: You satisfy contact, reduce their scoring threat, and keep your disc alive. If the line to stick is unreliable, prioritize clean contact and removal over greed.
Scenario 3: They Parked on the 15, Blocking the Center
Board: Opponent disc clogs the lane just inside the pegs. Play: Either freeze to it (light touch, stop adjacent) or take a controlled removal aiming to stick on the 10. Why: A good freeze can be more annoying than a removal; it forces awkward angles and reduces their 20 odds next turn.
Scenario 4: You’re Trailing Late by 15
Board: Several discs remain. Play: Increase variance: hunt a 20 if you have a credible line; otherwise attempt a take-out that sets your next 20 look. Why: When behind, EV favors shots that can swing the end. Avoid “safe” plays that leave you losing by a small margin.
Scenario 5: Doubles Mid-End, Partner After You
Board: Mixed clutter around 10/15. Play: Make a shot that gives your partner a defined next line (e.g., freeze that opens their clean removal or a guard that funnels a brush contact). Why: In pairs, you’re not solving the end alone—set tempo so your partner’s strengths shine.
Scenario 6: Last Shot, Tied on Rings, You Have No 20s
Board: One opponent disc on the 10; your disc on the 5. Play: Attempt a take-out and stick on the 10 (or better). Why: Flipping one ring tier is often the exact margin you need. Visualize the end score before choosing the line.
Singles vs. Doubles: What Changes
In singles, you own every plan from opener to endgame. You can specialize your style and repeat comfortable lines. In doubles, success depends on role clarity, communication, and trust. Agree on language for speed (soft, medium, firm), geometry (inside/outside peg), and intent (freeze, stick, guard). If one partner excels at removals and the other at touch shots, lean into that split—set up each other’s strengths and protect each other’s weak spots. Most pairs gain ground quickly once they define rhythm (pace between shots) and responsibilities (who calls lines on tight decisions).
The Mental Game: Poise Under Pressure
Strong mechanics wobble when nerves spike. Build a simple mental routine:
- Reset: Before each shot, plant the anchor hand, inhale, and exhale once to settle the shoulders.
- Picture: Visualize the disc traveling along the exact path and stopping point.
- Commit: Once you choose, commit fully—no mid-stroke doubts.
- Review: After the shot, briefly note one cue (good or bad) and move on. Don’t relive misses.
Between ends, check posture, sip water, and rehearse your next opener. Confidence is a byproduct of preparation; your drills are your nerves insurance.
Maintenance Deep-Dive: Keeping Glide Consistent
A consistent surface is a silent edge. Wipe dust with a clean, soft cloth before play. If using carnauba wax, apply a tiny amount and buff thoroughly to avoid slick patches. Never use silicone sprays—residue can be nearly impossible to remove and creates uneven speed. Inspect pegs occasionally; a loose or crooked peg changes rebounds dramatically. If your space is humid, store the board vertical in a climate-stable room and avoid direct sunlight, which can warp or discolor finishes over time.
Home Practice Games (Make Training Fun)
- Race to 10 Twenties: Alternate attempts; first to 10 clean 20s wins. Track streaks for a tie-breaker.
- Contact-Only Round: Start each turn with at least one opponent disc in play; every shot must make legal contact and finish on the board to count.
- Peg Park: Score a point each time you stop inside 15 without touching a peg; lose a point for peg contact. Play to 15.
- Take-Out & Stick Ladder: Place a target on the 10; remove it and stick on the 10 or 15 to climb the ladder. Missed sticks drop you down a rung.
Gamifying practice keeps sessions short, focused, and fun—exactly what builds lasting skill. Crokinole – How to Play like a Pro!


